Tap Settings → General (any Display Mode).
VBOX Touch will display the General Settings screen.
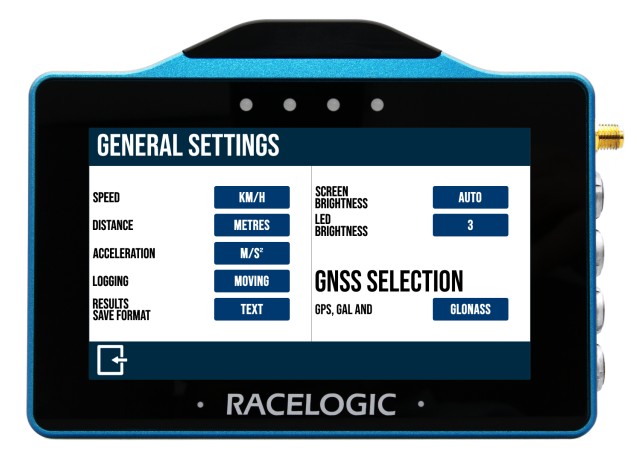
This menu contains units, logging mode, save format and brightness options.
Return to the selected Display Mode screen, by tapping on the Exit button in the bottom left corner.
Change the speed units between km/h and mph by tapping the button.
Changing the speed units will affect all visual speed parameters on all screens, unit labels will change and all speed values will be automatically recalculated accordingly.

Change the speed units between km/h and mph by tapping the button.
Changing the speed units will affect all visual speed parameters on all screens, unit labels will change and all speed values will be automatically recalculated accordingly.

Change the distance units between metres and feet by tapping the button.
Changing the distance units will affect all visual distance parameters on all screens, unit labels will change and all distance values and results will be automatically recalculated accordingly.

Change the distance units between metres and feet by tapping the button.
Changing the distance units will affect all visual distance parameters on all screens, unit labels will change and all distance values and results will be automatically recalculated accordingly.

Change the acceleration units between m/s² (default) and g by tapping the button.
Changing the acceleration units will affect all acceleration references on all screens, unit labels will change and all acceleration values and results will be automatically recalculated accordingly (with the exception of the PK G acceleration and deceleration test values).

Toggle between the 2 logging modes by tapping the button:
Continuous
VBOX Touch will start logging as soon as an SD card is inserted and initialised.
Moving (default)
VBOX Touch will start logging as soon as an SD card is inserted and it detects a speed of more than 0.5 km/h.
It will pause the logging when it detects a speed that is less than 0.5 km/h for 3 seconds, and will recommence once the speed is greater than 0.5 km/h again, appending the same file.

NOTES
- Manually pressing the green SD Card Icon will manually start and stop recording, regardless of the selected logging mode.
- A new data file is created every time VBOX Touch starts and stops logging, data is not appended to an existing data file.
- Continuous logging mode should be used when you have connected a Handheld Start/Stop Logging Switch (RLVBACS010) to control the logging.
Change the data format of the results saved (to the inserted SD card) from the test history screens.
Choose between text format (.txt), the default option, and comma-separated values format (.csv).

Change the data format of the results saved (to the inserted SD card) from the test history screens.
Choose between text format (.txt), the default option, and comma-separated values format (.csv).

Adjust the screen brightness between 5 levels, where 1 is the dimmest and 5 is the brightest.
An Auto setting is also available, which uses the internal ambient light sensor to adjust the screen brightness automatically. In dark conditions, the screen brightness will be dimmed, and in brighter conditions the screen will be brightened.
Tap the button to cycle through the available options.

Adjust the LED brightness between 5 levels, where 1 is the dimmest and 5 is the brightest setting, or turn the LEDs off.
Tap the button to cycle through the available options, the LEDs will preview the brightness level.

Adjust the LED brightness between 5 levels, where 1 is the dimmest and 5 is the brightest setting, or turn the LEDs off.
Tap the button to cycle through the available options, the LEDs will preview the brightness level.

CAUTION
LED Brightness level 5 is extremely bright!