This menu contains settings for network mounts, network options, system time and clock options, colour and light modes for the website, sound options, power save mode and SSD formatting.

Change the current network/LAN configuration of LabSat 4.
Note: If you change the network/LAN configuration, you will need to reopen the Web Server with the new IP address.
Enable Network Security
Click on the toggle switch to enable/disable network security.
If you enable network security, you will be prompted to enter a username and password to gain access to the Scenarios folder in File Explorer.
The username is generic for all LabSat 4 units, but the password will be unit-specific.
Username: labsat4
Password: labsat_<unit's serial number>
Note: If you are using a Windows-based PC, you will need to put a \ before the username (\labsat).
Enable DHCP
Click on the toggle switch to enable/disable Dynamic Host Configuration Protocol (DHCP).
When you enable DHCP, the static IP will be disabled.
Note: The connected network must be DHCP-enabled for an IP address to be assigned.
When DHCP is disabled, you can click in the value boxes to enter a new Static IP address, Subnet mask and Default gateway.
Click on the Refresh button to update the unit.

Toggle the Enable Ethernet Streaming switch to enable/disable Ethernet streaming to run real-time simulations with your LabSat 4 unit in SatGen 4.
You can find more information about real-time simulations in SatGen 4 here.

Toggle the Enable Ethernet Streaming switch to enable/disable Ethernet streaming to run real-time simulations with your LabSat 4 unit in SatGen 4.
You can find more information about real-time simulations in SatGen 4 here.

This area displays a list of the available Network File System (NFS) server connections set on the unit.
If there are no NFS mounts available, it will state No NFS mounts set.
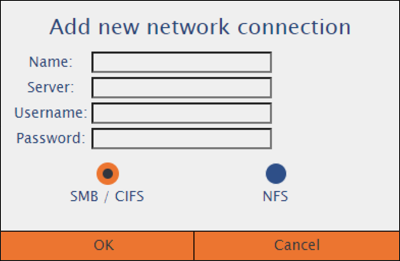
You can set an NFS mount by clicking on the Add new button and enter the required information for the network connection:
- Name
- Server address
- Username
- Password
- SMB/CIFS or NFS
Connect/disconnect by clicking on the Connected toggle switch for the relevant connection.
Click the Edit button to edit the, server address, username and password for the selected network connection.
Click the Delete button to delete the selected NFS server connection from the unit.
You can find more information about how to add a new network connection here.

This area displays a list of the available Network File System (NFS) server connections set on the unit.
If there are no NFS mounts available, it will state No NFS mounts set.
You can set an NFS mount by clicking on the Add new button and enter the required information for the network connection:
- Name
- Server address
- Username
- Password
- SMB/CIFS or NFS
Connect/disconnect by clicking on the Connected toggle switch for the relevant connection.
Click the Edit button to edit the, server address, username and password for the selected network connection.
Click the Delete button to delete the selected NFS server connection from the unit.
You can find more information about how to add a new network connection here.


Note: The mounting status of a connected NAS drive will not automatically update if the drive becomes unmounted. To make the Web Server reflect the mount status correctly, you must refresh the Web Server.
If you have rebooted the system, we recommend you wait a time equivalent to (the number of NAS drives + 2) seconds after the reboot, to ensure that the mounting operation has been completed, before you refresh the page.
Click on the toggle switch to disable/enable the GPS sync for the clock.
- When GPS sync is enabled, the clock will automatically sync to GPS time and you will not be able to adjust the time and date.
- When GPS sync is disabled, you can set the time and date manually by entering the required details in the relevant value boxes.
Define whether your LabSat 4 uses its internal TCXO or OXCO clock, or if it should use an external 10 MHz reference clock input.
When you are using TCXO or OCXO, you can also enable a 10 MHz clock output from the REF port on LabSat 4.
Click on the Enable 10.0 MHz clock output toggle switch to enable/disable the clock output.

Sounds
The Sounds option has three settings:
- All enabled - sound on key press and feedback sounds
- Key press silent - disable the key press sound
- Disable all sounds - disable all unit sounds
Enable power save
Click on the toggle switch to enable/disable power save mode.
This will power down the display backlight and the internal monitor when the unit is recording.

Select a colour scheme to apply to the Web Server.
LabSat
The default blue colour scheme
Light
Light grey background with black details and text
Dark
Black background with light blue details and text
System Light/Dark setting
The colours used in the LabSat 4 Web Server will be determined by the set Theme on the PC/device the Web Server is loaded on.
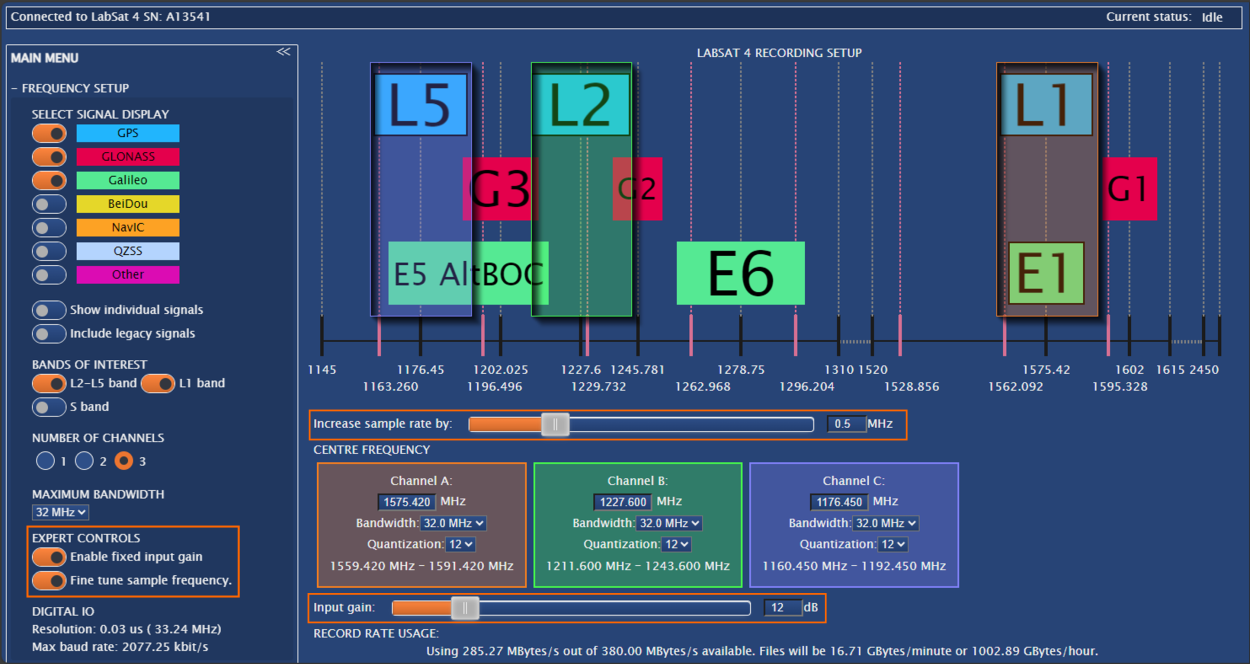
Enable this option to make the Expert Controls available in the Frequency Setup Menu.
When you enable the Expert Controls in the Frequency Setup Menu, you will see:
- A Fine Tune Sample Frequency setting has been added to the left-hand side of the window. When you enable it, you will see added lines in the frequency chart and a slider underneath it that you can use to aid in fine-tuning the sample frequency.
- A Enable Fixed Input Gain setting added to the left-hand side of the window. When you enable it, you will see an Input Gain slider added in the Centre Frequency area that you can use to adjust the fixed input gain.

Click the Apply changes button to write the new configuration to the unit.

Click the Apply changes button to write the new configuration to the unit.

Click on the toggle switch for Enable SSD format button to enable/disable the Format internal SSD button.
When the Format internal SSD button is enabled, you can click on it to format an SSD connected to the LabSat 4 unit.
Warning
Formatting the drive will erase all the recorded data on it.

Click on the toggle switch for Enable SSD format button to enable/disable the Format internal SSD button.
When the Format internal SSD button is enabled, you can click on it to format an SSD connected to the LabSat 4 unit.
Warning
Formatting the drive will erase all the recorded data on it.
