Model Limitations
- The Digital IO Setup menu will not be available for LabSat 4 Lite models.
- Sample Rate, Digitized Channel Select, CAN Log File Options, and RS232 Record Options will not be available for LabSat 4 (P) variants.
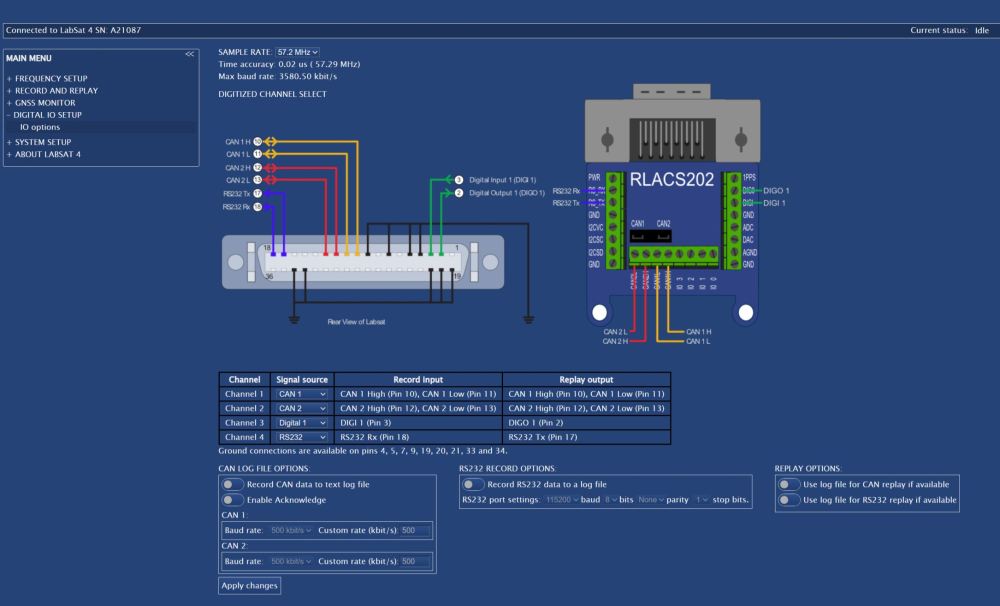
In the Digital IO Setup menu, you can configure the 4 external data channels to LabSat 4. These channels can be set up to record/replay CAN, RS232, and/or digital signals. You can also configure arbitrated CAN and RS232 recording/replay.
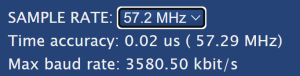
This section is where you can adjust the sample rate for the digital signals you want to capture in your scenario. By reducing the sample rate, the recorded data will take less space in the available recording rate.
The sample rate options will depend on the maximum bandwidth set on the frequency setup menu.
The Time accuracy and Max baud rate will update as you adjust the sample rate.

Note: Configured digital channels will be added in addition to the LabSat channels and will contribute to the Record rate usage. You can go to the Frequency Setup menu to check that it is within the required limitations. The digital channels will be the grey block in the Record rate usage bar.

This section contains a diagram of the pins in the Expansion Connector.
In the table below the diagram, you can set the signal source picking from the available channels:
- CAN 1
- CAN 2
- PPS
- RS232
- Digital 1
- Digital 2
After selecting a signal source, the Web Server will provide pin information for the record input and the replay output and the pin diagram for the Expansion Connector port and the Expansion Connector will update to illustrate the connections.
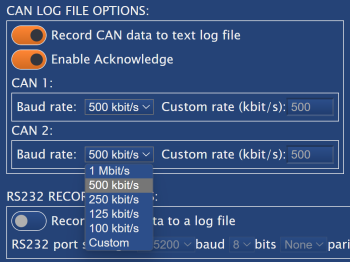
Click on the toggle switch next to Record CAN data to text log file to enable/disable the recording of CAN data to a text log file.
You can also enable acknowledgements from LabSat 4 to the CAN bus; click on the toggle switch next to Enable Acknowledge.
When you enable CAN data recording, you can set the Baud rate for the CAN 1 and CAN 2 signals:
- 1 Mbit/s
- 500 kbit/s
- 250 kbit/s
- 125 kbit/s
- 100 kbit/s
- Custom
If you select Custom, you can type in the required baud rate in the value box.

Click on the toggle switch next to Record RS232 data to log file to enable/disable the recording of RS232 data to a log file.
When you have enabled this, you will get access to the following RS232 port settings:

Click on the toggle switch next to Record RS232 data to log file to enable/disable the recording of RS232 data to a log file.
When you have enabled this, you will get access to the following RS232 port settings:

| Baud Rate | Bits | Parity | Stop bits |
|---|---|---|---|
| 4800 | 5 | None | 1 |
| 9600 | 6 | Odd | 2 |
| 14400 | 7 | Even | |
| 19200 | 8 | ||
| 28800 | |||
| 38400 | |||
| 56000 | |||
| 57600 | |||
| 115200 | |||
| 230400 |
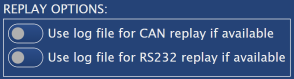
Click on the toggle switch for Use log file for CAN replay if available to enable/disable the usage of an available log file for CAN replay.
Click on the toggle switch for Use log file for RS232 replay if available to enable/disable the usage of an available log file for RS232 replay.
Click on the toggle switch for Use log file for CAN replay if available to enable/disable the usage of an available log file for CAN replay.
Click on the toggle switch for Use log file for RS232 replay if available to enable/disable the usage of an available log file for RS232 replay.

Click on the Apply changes button to save all changed settings to LabSat 4.

Click on the Apply changes button to save all changed settings to LabSat 4.
