Model Limitations
For LabSat 4 (RP) variants only.
LabSat 4 Record and Replay variants use an internal SSD to record GNSS data.
You can also connect to and use an external USB storage device to record the data.
The placement and setup of the GNSS antenna will depend on the use case. However, if you are using a vehicle to record the scenario file, it is important that the antenna is placed in the ideal location on the vehicle.
You can read more about antenna placement on a vehicle here.
LabSat 4 has 3 RF channels. This gives you the ability to record 1, 2 or 3 frequency bands.
You can configure the recording of the desired constellations, including frequency, bandwidth and quantization, in the Constellation menu on the front panel display or in the Frequency Setup menu in the LabSat 4 Web Server. You can select up to 3 of the desired constellation groups.
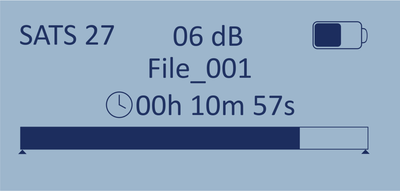
When you have configured the constellations, you can exit the menu and press the REC button to begin recording. The unit will create a new file each time it starts recording. The file name will be File_001 where the number will be one higher than the highest already saved on the media.
Note:
Although you can configure LabSat 4 to have a bandwidth of up to 60 MHz and a quantization of up to 12 for each of the 3 RF channels, the different combinations of these settings may increase the data rate to a level that is incompatible with the unit. You must, therefore, keep this limitation in mind when you configure your unit. You can find more information about the validity of the different configuration possibilities here.
In most cases, we recommend using a quantization setting of 1-4 bits, as most receivers do not require a resolution greater than this. However, if you are performing special signal analysis and control, you may need to use 8 or 12 bits.
Model Limitations
The available quantization options will differ depending on the LabSat 4 model.
To maximise battery life during recording, LabSat 4 has a power-save mode enabled by default. You can change this setting in the Setup Menu. The power-save mode recognises when the unit is running from battery power and will dim the display backlight and power down the internal GNSS monitor after 1 minute with no user activity.
If you are recording from passive antennas, such as the Maxtenna M1516HCT-SMA GPS/GLONASS antenna, enabling the power-save mode will also provide the highest possible sensitivity by ensuring that unused modules in LabSat 4 are switched off.
This is an example of how to record a file to the internal SSD on LabSat 4.
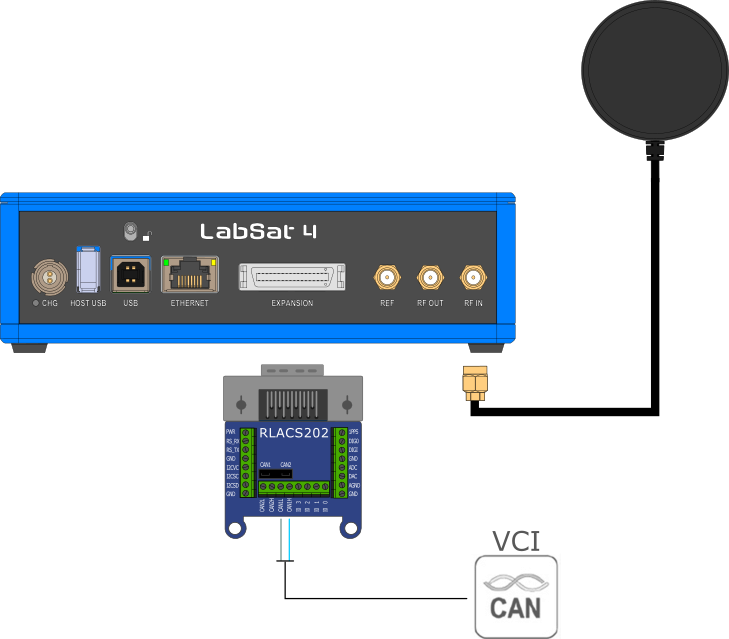
1. Connect the antenna to the RF IN port on the rear panel of the LabSat 4 unit.
2. Place the GNSS antenna in the middle of the vehicle roof, at least 10 cm from any other antennas or objects.


3. Press the POWER button to power up the unit. Ensure you have selected the correct recording settings (quantization, bandwidth and frequency).
4. Press the REC button on the front panel to start the recording.


5. Drive the desired route for the scenario.
6. Press the REC button again to stop the recording.


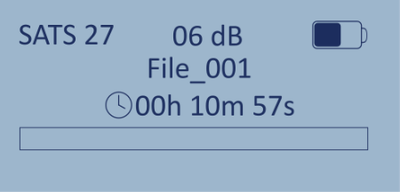
The Record Screen will display the number of satellites, the allocated file name, the recording duration, and the CAN and RS232 logs being recorded (if enabled). The flashing square next to a signal type indicates that the signal is being recorded. When a recording is complete, the File Selection Screen will open with the recorded file in the list of available files.
The Record Screen will display the number of satellites, the allocated file name, the recording duration, and the CAN and RS232 logs being recorded (if enabled). The flashing square next to a signal type indicates that the signal is being recorded. When a recording is complete, the File Selection Screen will open with the recorded file in the list of available files.
During recording, if the SSD becomes full, the recording will stop automatically.
LabSat 4 contains an onboard GNSS receiver that gives you the ability to monitor the RF signals during record or replay. If you press the OK button while the unit is recording, it will switch the display to show available satellite levels for the different constellations. In this display mode, you can use the UP/DOWN buttons to toggle between the different constellations. Press the OK button in this display mode to open the file status. Press the OK button again to return to the record status display mode.
Note: During recording, while using battery power, the GNSS monitor display will automatically revert to the record display after a short period to conserve battery power. This power save feature can be switched off, but it is recommended to be left active for maximum battery life.
LabSat 4 uses an internal SSD to replay GNSS data.
You can also connect to and use an external USB storage device or a Network Attached Storage (NAS) device to replay the data.
The RF OUT connector on the rear panel of LabSat 4 is a 50 Ω output that can be connected directly to the antenna input of the GNSS receiver under test. The RF OUT connector on your LabSat 4 is DC blocked internally to make it safe to connect almost any device to this port.
Example of how to replay a scenario file from the SSD.
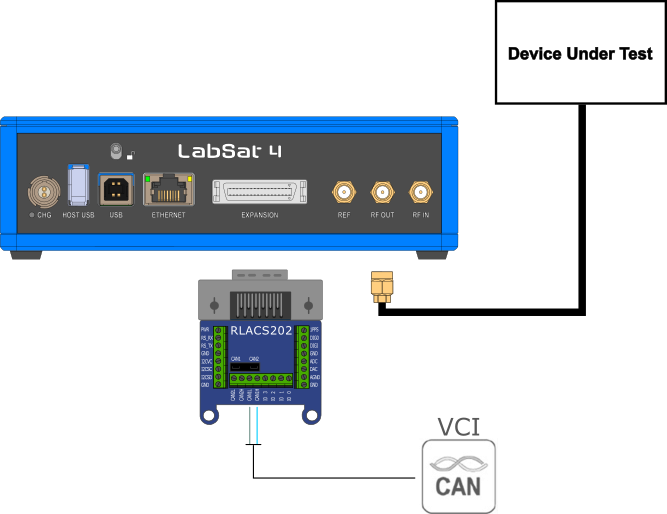
1. Connect the Device Under Test (DUT) to the RF OUT port on the rear panel on the LabSat 4 unit. Press the POWER button to power up the unit.
2. Use the up and down arrow buttons on the front panel to select the relevant scenario file.


3. Press the Play button. This will display the Replay Status screen and start the playback of the file.
4. The DUT should now be receiving the replayed satellite signal data, making it possible to perform realistic and repeatable tests under controlled conditions. Press the PAUSE / PLAY button during the replay to stop the replay.


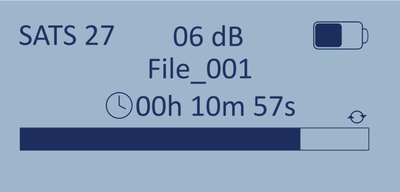
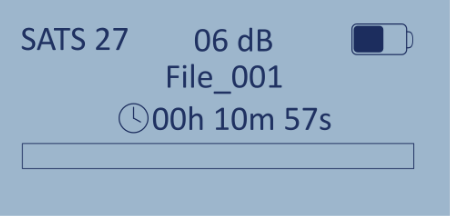
The Replay Screen will display the number of satellites, the file name, the replay duration, the progress through the length of the recording file and any applied signal attenuation. When the replay has finished, the File Selection Screen will open.

The Replay Screen will display the number of satellites, the file name, the replay duration, the progress through the length of the recording file and any applied signal attenuation. When the replay has finished, the File Selection Screen will open.
LabSat 4 contains an onboard GNSS receiver that gives you the ability to monitor the RF signals during record or replay. If you press the OK button while the unit is replaying, it will switch the display to show available satellite levels for the different constellations. In this display mode, you can use the UP/DOWN buttons to toggle between the different constellations. Press the OK button in this display mode to open the file status. Press the OK button again to return to the replay status display mode.
Note: When you switch between GNSS monitor modes, it will take some time for the internal receiver to re-acquire satellite signal levels.

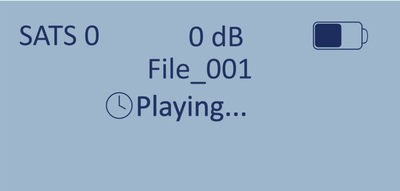
When you press the Play/Pause button to start replaying a file, the unit will display the status "Playing" while the file is being prepared. The file will start playing, with the replay settings configured in the Play Options Menu, as soon as it is ready.
When you press the Play/Pause button to start replaying a file, the unit will display the status "Playing" while the file is being prepared. The file will start playing, with the replay settings configured in the Play Options Menu, as soon as it is ready.

If you have selected to loop the file during the replay, you will see the Loop symbol displayed on the right-hand side, above the progress bar, when the file starts replaying.
The file will continue to play until you press the Play/Pause button again.
If you have selected to loop the file during the replay, you will see the Loop symbol displayed on the right-hand side, above the progress bar, when the file starts replaying.
The file will continue to play until you press the Play/Pause button again.

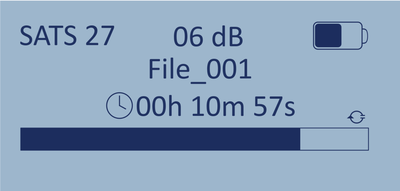
If you select to loop the file during replay, but with an added pause before the file loops, LabSat 4 units will display a Loop with Pause symbol on the right-hand side, above the progress bar, when the file starts replaying.
If you select to loop the file during replay, but with an added pause before the file loops, LabSat 4 units will display a Loop with Pause symbol on the right-hand side, above the progress bar, when the file starts replaying.

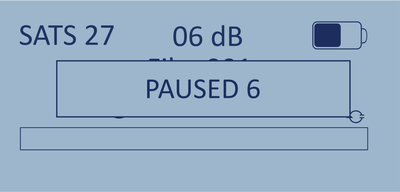
When the file has finished replaying, LabSat 4 will display a message stating that the replay has been paused and a countdown with the set pause time. When the countdown reaches 0, the file will restart from the beginning.
When the file has finished replaying, LabSat 4 will display a message stating that the replay has been paused and a countdown with the set pause time. When the countdown reaches 0, the file will restart from the beginning.

If you have set a time you want to start the replay From in the Play Options Settings, LabSat 4 will display an arrow at the beginning of the progress bar to indicate that the setting has been applied.
If you have set a time you want the replay to Play For in the Play Options Settings, LabSat 4 will display an arrow at the end of the progress bar to indicate that the setting has been applied.
Model Limitations
- Recording functionality is only available on LabSat 4 (RP) variants.
- LabSat 4 Lite models cannot record or replay external signals.
LabSat 4 can record and replay CAN data in addition to GNSS signal data.
There are two methods you can use to record CAN:
- A digitized mode where LabSat 4 samples the raw logic level transitions of the CAN data and reconstructs the signal during replay
- A log file mode, where LabSat 4 receives CAN data and stores the data in a readable text file.
You can use log file mode and digitize mode simultaneously to record data and then choose whether to replay it as digitized or as logged data.
You can see the differences between the Digitized mode and the Log file mode below:
| Strengths | Weaknesses | |
|---|---|---|
Digitized Mode |
|
|
Log File Mode |
|
|
Digitized
In digitized mode, the data level is sampled and stored in synchronisation with the recorded GNSS data. When replayed, the levels are recreated and output via a voltage level shifter to the CAN output of LabSat 4. The benefit of this method is that you are not required to configure the baud rate. You can also use this method to capture binary data that does not use the ASCII format.
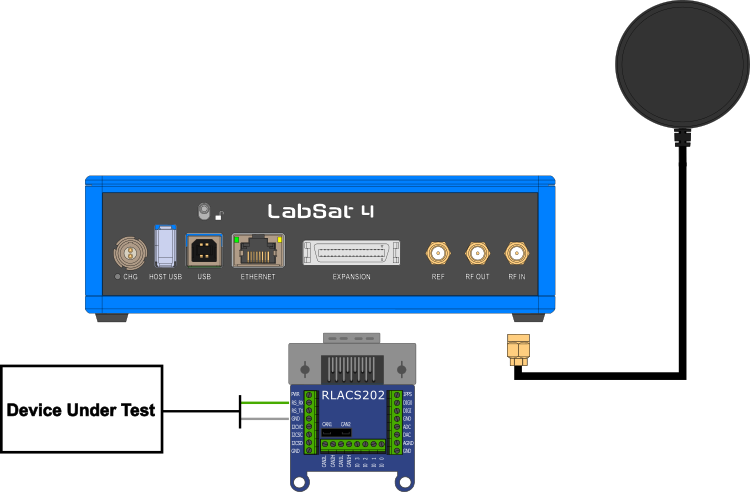
Recording
- Connect the CAN1 High and CAN1 Low ports of the RLACS202 Expansion Connector to the appropriate wires/cable.
- Connect the LabSat 4 antenna (RLACS354) to the RF IN port.
- Connect the Expansion Connector to the Expansion port on the rear panel of LabSat 4.
- Power up LabSat 4 and navigate to the Digital menu in the Setup menu.
Menu → Setup → Digital → CH1/CH2/CH3/CH4
- Select CAN1/CAN2.
- Exit the menu.
Press the REC button on the front of LabSat 4 to begin the recording.
LabSat 4 will record all CAN data available on the connected CAN bus.
The Record Screen will display the number of satellites, the allocated file name, the recording duration, and the CAN logs being recorded (if enabled). The flashing square next to a signal type indicates that the signal is being recorded. When a recording is complete, the File Selection screen will open with the recorded file in the list of available files.
The Record Screen will display the number of satellites, the allocated file name, the recording duration, and the CAN logs being recorded (if enabled). The flashing square next to a signal type indicates that the signal is being recorded. When a recording is complete, the File Selection screen will open with the recorded file in the list of available files.
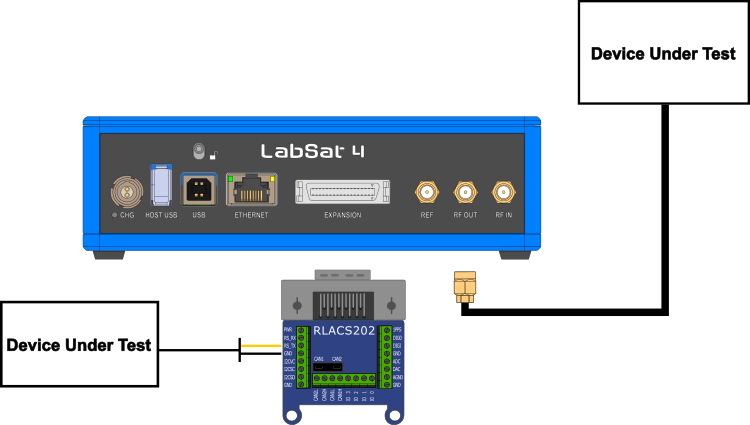
Replaying
- Connect from the CAN1 High and CAN1 Low ports of the RLACS202 Expansion Connector to the appropriate wires/port on the device under test.
- Connect the device under test to the RF OUT port on the rear panel on LabSat 4.
- Connect the Expansion Connector to the Expansion port on the rear panel on LabSat 4.
- Power up LabSat 4 and select the previously recorded CAN scenario file.
- Press the Play button on the front of LabSat 4 to begin the playback.
LabSat 4 will replay all CAN data originally recorded.
The Replay Screen will display the number of satellites, the file name, the replay duration, the progress through the length of the recording file and any applied signal attenuation. When the replay has finished, the File Selection Screen will open.
The Replay Screen will display the number of satellites, the file name, the replay duration, the progress through the length of the recording file and any applied signal attenuation. When the replay has finished, the File Selection Screen will open.
IMPORTANT
If the recording contains CAN 1 and CAN 2 at the same time, you must replay with both CAN 1 and CAN 2 ports connected.
If you replay this recording with only CAN1 OR CAN2 connected, no CAN data will be replayed, and the replay may stall.
Log File
Selecting the 'LOG FILE' mode for CAN recording enables data to be recorded in an easy-to-read text log file.
During recording, the CAN controller listens to the CAN bus and stores incoming data. LabSat 4 will transmit acknowledge pulses on the bus in response to correctly received data unless you disable the Enable Acknowledge option in the Setup menu. The ability to transmit acknowledge pulses in ‘LOG FILE’ mode means it can record data directly from inertial sensors or other devices with a CAN bus output.
Because Log File data is received and processed by LabSat 4, you must configure the correct data or baud rate on LabSat 4.
Note: There will be some variation in data output timing when compared to the recorded timing.
During the replay of data recorded in the ‘LOG FILE’ mode, the LabSat 4 unit scans through the log file, sending the CAN data at the time intervals indicated by the time-stamp. Because CAN data is transmitted using an active CAN Bus controller, the LabSat 4 unit will arbitrate by listening to the current bus state and only transmit the data between messages that may be sent from other nodes.
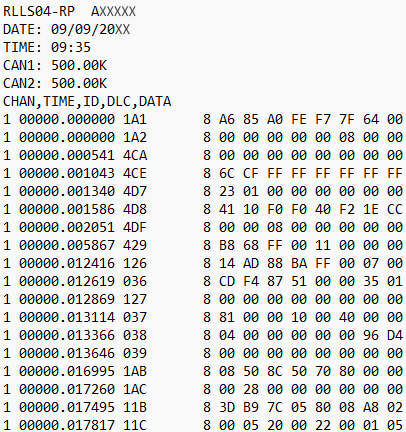
The log file contains a header detailing the LabSat unit's serial number, time, date, CAN bus baud settings and GNSS settings. At the end of the log file, it has a summary of the number of CAN messages received on each channel during the recording.
Each line of CAN data recorded contains the following space-delimited information:
- CHAN - the CAN Channel the data was received on, 1 or 2.
- TIME - Timestamp to 1 ms resolution.
- ID - Identifier, ‘x’ suffix is shown for extended CAN IDs.
- DLC - Data length code DLC, this shows the number of data bytes within the CAN frame.
- DATA - Data section, up to 8 bytes of data as indicated by the DLC.
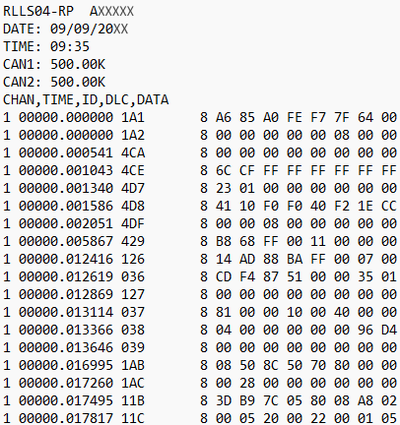
Once a log file has been created, you can modify it using a text editor application such as Notepad to change the replayed output.
Each line of CAN data recorded contains the following space-delimited information:
- CHAN - the CAN Channel the data was received on, 1 or 2.
- TIME - Timestamp to 1 ms resolution.
- ID - Identifier, ‘x’ suffix is shown for extended CAN IDs.
- DLC - Data length code DLC, this shows the number of data bytes within the CAN frame.
- DATA - Data section, up to 8 bytes of data as indicated by the DLC.
Once a log file has been created, you can modify it using a text editor application such as Notepad to change the replayed output.
IMPORTANT
Take care when you configure the CAN bus settings, as incorrect settings can lead to bus errors or crashes.
Recording
- Connect the CAN1 High and CAN1 Low ports of the RLACS202 Expansion Connector to the appropriate wires/cable.
- Connect the LabSat 4 antenna (RLACS354) to the RF IN port on the rear panel of LabSat 4.
- Power up LabSat 4 and navigate to the CAN section of the menu.
Menu → Setup → CAN → Log File - Press the OK button with Log File highlighted to enable it.
- Set the baud rate for both the CAN channels.
Menu → Setup → CAN → CAN1/CAN2 - Exit the menu.
- Connect the Expansion Connector to the Expansion port on LabSat 4.
- Press the REC button on the front of LabSat 4 to start the recording.
LabSat 4 will record all CAN data available on the connected CAN bus.
The Record Screen will display the number of satellites, the allocated file name, the recording duration, and the CAN logs being recorded (if enabled). The flashing square next to a signal type indicates that the signal is being recorded. When a recording is complete, the File Selection Screen will open with the recorded file in the list of available files.
The Record Screen will display the number of satellites, the allocated file name, the recording duration, and the CAN logs being recorded (if enabled). The flashing square next to a signal type indicates that the signal is being recorded. When a recording is complete, the File Selection Screen will open with the recorded file in the list of available files.
Replaying
- Connect the CAN1 High and CAN1 Low ports of hte RLACS202 Expansion Connector to the appropriate wires/port on your device under test.
- Connect the device under test to the RF OUT port on the LabSat 4.
- Connect the Expansion Connector to the Expansion port on the rear panel of LabSat 4.
- Power up the LabSat 4 and navigate to the CAN menu in the Setup menu.
Menu → Setup → CAN → REPLAY Log File - Press the OK button with Replay Log File highlighted to enable it.
- Exit the menu.
- Highlight the relevant scenario file on the File Selection Screen.
- Press the Play button on the front of LabSat 4 to start the replay.
LabSat 4 will replay all CAN data originally recorded.
The Replay Screen will display the number of satellites, the file name, the replay duration, the progress through the length of the recording file and any applied signal attenuation. When the replay has finished, the File Selection Screen will open.
The Replay Screen will display the number of satellites, the file name, the replay duration, the progress through the length of the recording file and any applied signal attenuation. When the replay has finished, the File Selection Screen will open.
IMPORTANT
If the recording contains CAN1 and CAN2 at the same time, you must replay with both CAN1 and CAN2 ports connected.
If you replay this recording with only CAN1 OR CAN2 connected, no CAN data will be replayed, and the replay may stall.
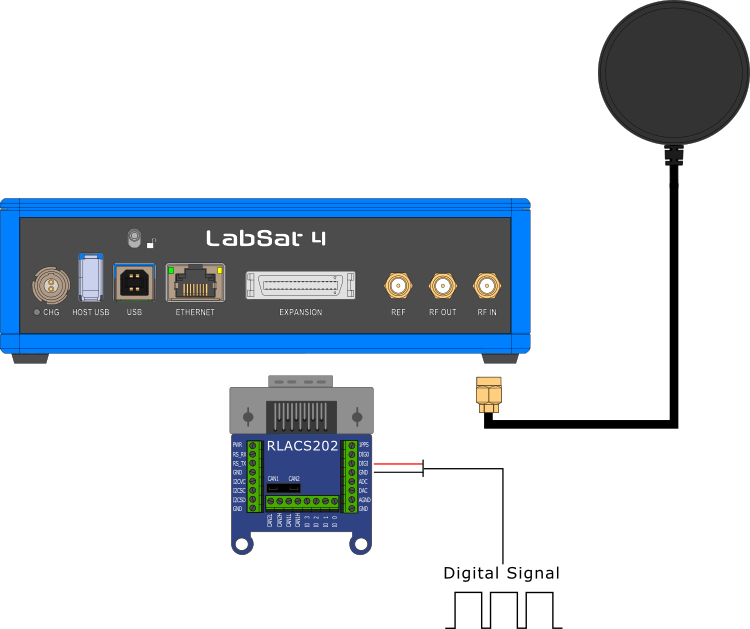
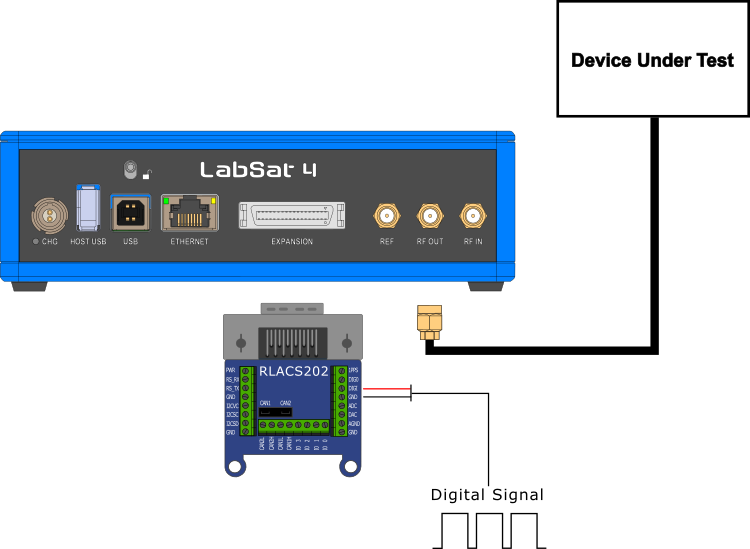
LabSat 4 can record and replay digital signals in addition to GNSS signal data.
Recording
- Connect the DIGI and GND ports of the RLACS202 Expansion Connector to the appropriate wires/cable. If you need a second channel, you can also use the DAC port.
- Power up the LabSat 4 unit and navigate to the Digital section of the menu.
- Select the DIGI option.
- Connect the expansion connector to the Expansion port on the LabSat 4 unit.
- Press the REC button on the front of the LabSat 4 to start the recording.
The LabSat 4 will record all digital signals available.
Replaying
- Connect the DIGO and GND ports of the expansion connector the appropriate wires/cable.
- Connect the expansion connector to the Expansion port on the LabSat 4 unit.
- Highlight the relevant scenario on the File Selection Screen.
- Press the Play button on the front of LabSat 4 to start the scenarion playback.
There are two methods you can use to record RS232:
- A digitized mode where LabSat 4 samples the raw logic level transitions of the RS232 data and reconstructs the signal during replay.
- The log file mode, where LabSat 4 receives each RS232 data byte and stores the data in a readable text file.

In either mode, the RS232 signal is converted from the normal signal levels of approximately ±12 V down to 3 V logic levels to match hte internal logic of LabSat 4.
You can use log file mode and digitize mode simultaneously to record data and then choose whether to replay it as digitized or as logged data.
You can see the differences between the Digitized mode and the Log File mode below:
| Strengths | Weaknesses | |
|---|---|---|
Digitized Mode |
|
|
Log File Mode |
|
|
Digitized
In digitized mode, the data level is sampled and stored in synchronisation with the recorded GNSS data. When replayed, the levels are recreated and output via voltage level shifter to the RS232 output of LabSat 4. The benefit of this method is that you are not required to configure the baud rate. You can also use this method to capture binary data that does not use the ASCII format.
Recording
- Connect the RS_Rx and GRN ports of the RLACS202 Expansion Connector to the appropriate wires/cable.
- Connect the Expansion Connector to the Expansion port on the rear panel of LabSat 4.
- Power up LabSat 4.
- Navigate to the Digital section of the menu. Select the RS232 option.
Menu → Setup → Digital → CH1/CH2/CH3/CH4 → RS232 - Exit the menu.
- Press the REC button on the front of LabSat 4 to start the recording.
LabSat 4 will record all available serial messages.
The Record Screen will display the number of satellites, the allocated file name, the recording duration, and the RS232 logs being recorded (if enabled). The flashing square next to a signal type indicates that the signal is being recorded. When a recording is complete, the File Selection Screen will open with the recorded file in the list of available files.
The Record Screen will display the number of satellites, the allocated file name, the recording duration, and the RS232 logs being recorded (if enabled). The flashing square next to a signal type indicates that the signal is being recorded. When a recording is complete, the File Selection Screen will open with the recorded file in the list of available files.
Replaying
- Connect from the RS_Tx and GRN ports on the RLACS202 Expansion Connector to the relevant wires/ports on the device under test.
- Connect the Expansion Connector to the Expansion port on the rear panel of LabSat 4.
- Select the previously recorded RS232 scenario file and press the Play button on the front of LabSat 4 to start the playback.
The Replay Screen will display the number of satellites, the file name, the replay duration, the progress through the length of the recording file and any applied signal attenuation. When the replay has finished, the File Selection Screen will open.
The Replay Screen will display the number of satellites, the file name, the replay duration, the progress through the length of the recording file and any applied signal attenuation. When the replay has finished, the File Selection Screen will open.
Log File
Log File mode is suitable for recording ACSII text-based message data. As data is received, a new time-stamped line is created in a log file which has the same name as the GNSS signal data but with a .ser extension. Each byte of incoming data is added to the line until LabSat 4 recognises a carriage return [CR] or a line feed [LF] character. On receiving a CR, LF or both characters together, a new line is started in the text file with a new timestamp for the next received character.
| ACSII | Hex | Dec | Use |
|---|---|---|---|
| 0x0d | 13 | Carriage return | |
| 0x0a | 16 | Line feed, end delimiter |
An example of an ASCII formatted message would be NMEA data from a GNSS module:
$GPGGA,123519,4807.038,N,01131.000,E,1,08,0.9,545.4,M,46.9,M,,*47
Because Log File data is received and processed by LabSat 4, you must configure the correct data or baud rate on LabSat 4. The standard rate for NMEA is 4800 bit/s, but it is not uncommon for systems to use other rates such as 9600 or 115,200 bit/s.

The first section of the log file contains details such as the serial number of LabSat 4, the date and time of recording and the baud rate settings. After the [TIME] and character heading, the received data will appear along with the timestamp of the start of each line.
When you replay a recording with logged RS232 data, LabSat 4 uses the timestamp in the file to replay each line at the corresponding time.
Note: There will be some variation in data output timing when compared to the record timing.
Once a Log File has been created, you can modify the log file by using a text editor application such as Notepad to change the replayed output.
Recording
- Connect the RS_Rx and GRN ports of the RLACS202 Expansion Connector to the appropriate wires/cable.
- Connect the Expansion Connector to the Expansion port on the rear panel of LabSat 4.
- Power up LabSat 4.
- Navigate to the RS232 Log File option.
Menu → Setup → RS232 → Log File - Press the OK button with Log File highlighted to enable it.
- Exit the menu.
- Press the REC button on the front of LabSat 4 to start the recording.
LabSat 4 will record all available serial messages.
The Record Screen will display the number of satellites, the allocated file name, the recording duration, and the RS232 logs being recorded (if enabled). The flashing square next to a signal type indicates that the signal is being recorded. When a recording is complete, the File Selection Screen will open with the recorded file in the list of available files.
The Record Screen will display the number of satellites, the allocated file name, the recording duration, and the RS232 logs being recorded (if enabled). The flashing square next to a signal type indicates that the signal is being recorded. When a recording is complete, the File Selection Screen will open with the recorded file in the list of available files.
Replaying
- Connect from the RS_Tx and GRN ports on the RLACS202 Expansion Connector to the relevant wires/port on the device under test.
- Connect the Expansion Connector to the Expansion port on the rear panel of LabSat 4.
- Power up LabSat 4 and navigate to the RS232 menu.
Menu → Setup → RS232 → REPLAY Log File - Press the OK button with REPLAY Log File highlighted to enable it.
- Exit the menu.
- Highlight the required scenario file and press the Play button on the front of LabSat 4 to start the playback.
The Replay Screen will display the number of satellites, the file name, the replay duration, the progress through the length of the recording file and any applied signal attenuation. When the replay has finished, the File Selection Screen will open.
The Replay Screen will display the number of satellites, the file name, the replay duration, the progress through the length of the recording file and any applied signal attenuation. When the replay has finished, the File Selection Screen will open.