

| Product Code | Description | Port | Function |
|---|---|---|---|
| RLACS229 | LabSat 4 Internal Battery | Internal Battery Mount | Battery power supply |
| RLACS313 | 8 GB SD Card | SD Card Slot | Firmware upgrade only |
| LS04SSD-7TB | 7.68TB SSD | Internal SSD Mount | Media storage |
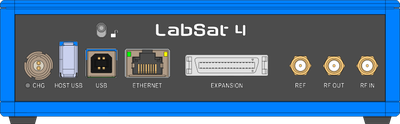
| RLACS354 | LabSat 4 GNSS Antenna | RF IN | GNSS antenna |
| RLVBACS020* | Mains Power Cable | CHG | Mains power supply |
| RLCAB010LE* | 12 V Cigar Plug Power Cable | CHG | Vehicle power supply |
| RLACS202** | Expansion Connector Adapter | EXPANSION | External data input/output |
| RLACS289 | USB 3.0 to SATA adapter cable | Host USB | Connection to storage device |
| RLCAB042 | USB 'A' to USB 'B' - 2m cable | USB | NMEA output to PC |
| RLCAB071-1 | SMA -SMA Cable (1 m) | RF OUT | Device Under Test (DUT) |
| RLCAB071-1 | SMA -SMA Cable (1 m) | REF | 10 MHz external clock reference |
| RLCAB082-1 | SMA-MCX Cable (1 m) | RF OUT | Device Under Test (DUT) |
| RLCAB083-1 | SMA-MMCX Cable (1 m) | RF OUT | Device Under Test (DUT) |
| RLCAB084-1 | SMA-TNC Cable (1 m) | RF OUT | Device Under Test (DUT) |
| RLCAB084-1 | SMA-TNC Cable (1 m) | REF | 10 MHz external clock reference |
Model Limitations
* Not supplied with LabSat 4 (P) variants
** LabSat 4 Lite models cannot record/replay External Signals.
LabSat 4 is shipped with a rechargeable, lithium-ion Smart battery pack (Inspired Energy NB2037HD34). It is UN38.3 (transportation) certified and CE, FCC and REACH/RoHS compliant.
The battery pack will power LabSat 4 for at least 1 hour of operating time. When LabSat 4 is powered externally, it will charge the internal battery pack (if fitted in LabSat 4), and seamlessly switch to battery operation when external power is removed.
If LabSat 4 is switched off while connected to an external supply, it will continue to charge the battery until it reaches full capacity. Charging in progress is indicated by the blue CHG LED under the power port on the rear panel. When the charging stops, the blue LED will turn off.
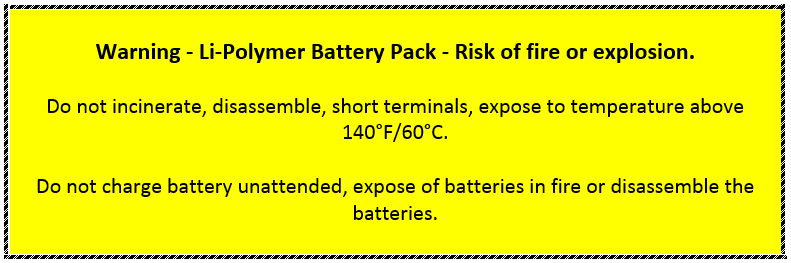
WARNING
- Never leave a system unattended during the charging or discharging of the battery pack.
- The battery should be fully charged when stored.
If a battery is left depleted for a prolonged period then it is likely that the performance of the battery will degrade and may be unusable.

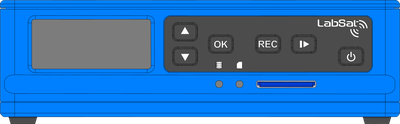
When LabSat 4 is operating from battery power, you can see the charge status of the battery in the top-right section of the display.

When LabSat 4 is operating from battery power, you can see the charge status of the battery in the top-right section of the display.

If you are using external power and the battery is being charged, you will see a power symbol over the battery symbol.

If you are using external power and the battery is being charged, you will see a power symbol over the battery symbol.
The discharge temperature range for the battery is - 20 °C to + 60 °C.
If LabSat 4 is operating from battery power and the temperature falls outside of this range, the unit will power down.
The charge temperature range of the battery pack is 0 to + 45°C.
If the temperature falls outside this temperature range, LabSat 4 will stop the charging of the internal battery but will continue to operate from the external power supply.
If the internal temperature exceeds the maximum operating temperature LabSat 4 will display a warning on the screen.

The warning will disappear when the internal temperature drops back down into the operating range again.
- Make sure that LabSat 4 is disconnected from mains power.
- Push down the lid release lever on the rear panel of LabSat 4.
- Slide off the unit lid and insert the battery into the battery slot. Make sure that the connector on the battery mates with the battery connector inside the unit.
- Slide the lid back on. The lid release lever will automatically lock when you close the lid.
- Make sure that LabSat 4 is disconnected from mains power.
- Push down the lid release lever on the rear panel of LabSat 4.
- Slide off the unit lid and lift the battery out by the plastic tab attached to the battery pack.
- Slide the lid back on. The lid release lever will automatically lock when you close the lid.
If you need to replace the battery pack, you must replace it with Part No. RLACS229 from Racelogic.
Use of another battery may present a risk of fire, explosion or other malfunction.
Caution:
The battery used in this device may result in a fire or chemical burn hazard if mistreated.
- DO NOT disassemble, heat up to more than 80 °C (176 °F) or incinerate the battery pack.
- Do not disassemble the cells. Disassembling cells may cause an internal short circuit in the cell, which could further result in gassing, fire, or other problems.
- Do not immerse the battery pack in water.
- Do not short-circuit the battery pack.
This will generate very high currents resulting in overheating of the cells, which may in turn cause electrolyte leakage, gassing or fire. - Cells may be damaged by shocks or other causes during shipping. If you see any abnormal features on the battery pack, such as damage to a plastic envelope of the cell, deformation of the cell container, smell of electrolyte, an electrolyte leakage, etc., you must not use the battery pack.
- Cells with a smell of electrolyte or leakage should be kept away from fire to avoid ignition.
- Please dispose of old, damaged and used batteries promptly, following your local regulations.
Warning:
- If for any reason the battery pack becomes damaged it can leak electrolytes that are harmful to the human body.
If the electrolyte comes into contact with the skin, eyes or other parts of the body, the electrolyte shall be flushed immediately with fresh water. Seek immediate medical advice from a physician. - Keep away from children.